How to use environment variables to configure your Angular application without a rebuild


In February 2016, I published an article on how to configure your AngularJS 1.x application using environment variables.
The article explains how we can extract all configuration details out of an AngularJS 1.x application so that we can:
- deploy our AngularJS 1.x application in different environments (staging, production, etc.) with different configurations without changing the AngularJS application code and without rebuilding the AngularJS application.
- share our AngularJS 1.x application code with external parties at any given moment without leaking any confidential configuration details.
Many developers and businesses have been using the outlined architecture from that article with great results in AngularJS 1.x.
Since the release of Angular, however, I was asked regularly how the same tactics could be used in Angular 2+. As a result, this article explains how you can configure an Angular 2+ application without rebuilding it.
Let's get started by having a look at why the built-in Angular CLI application environments are awesome, but won't work for the purpose of configuring an application without a rebuild.
Angular CLI Application Environments
Most Angular applications contain logic.
And thus most Angular applications typically have a config, containing settings like:
- the URL of the API to communicate with
- whether or not to log debug messages
- etc.
Angular CLI offers application environments to configure different settings at build time.
In Angular 2+, the angular.json file contains build-specific instructions for every application in your repository, including environment settings:
{
  "projects": {
    "app-name": {
      "architect": {
        "build": {
          "configurations": {
            "production": {
              "fileReplacements": [
                {
                  "replace": "src/environments/environment.ts",
                  "with": "src/environments/environment.prod.ts"
                }
              ],
              // ...
            }
          }
        }
      }
    }
  }
}
where fileReplacements represents an environment-specific list of files you wish to have replaced at build time.
In the scenario above, Angular CLI knows to replace src/environments/environment.ts with src/environments/environment.prod.ts if the production configuration is used.
So if environments/environments.prod.ts looks like this:
export const environment = {
  apiUrl: 'http://my-api-url',
  enableDebug: false
};
and you run ng build --configuration=production, Angular CLI will make sure the file replacements are performed and src/environments/environment.ts is overwritten by src/environments/environment.prod.ts.
As a result, you can always import environments/environment.ts in your application to access the environment variables, relying on the fact that Angular CLI has replaced the file it with the correct file:
import { Component } from '@angular/core';
import { environment } from './../environments/environment';

@Component({
  selector: 'app-root',
  templateUrl: './app.component.html',
  styleUrls: ['./app.component.css']
})
export class AppComponent {
  constructor() {
    console.log(environment.apiUrl);
  }
  title = 'app works!';
}
This works great! However, it also has limitations.
The Limitations of Angular CLI Application Environments
Limitation 1: Every environment requires a separate build
Having a build-time configuration requires that you generate a different build for each of your environments. You can automate builds and deployments, but what if your build is client-specific? What if you wish to deploy the same Angular application for different clients with different settings?
You could create an environment file for every client:
{
"projects": {
"app-name": {
"architect": {
"build": {
"configurations": {
"production": {
"fileReplacements": [
{
"replace": "src/environments/environment.ts",
"with": "src/environments/environment.prod.ts"
}
],
// ...
},
"staging-client-a": {
"fileReplacements": [
{
"replace": "src/environments/environment.client-a.staging.ts",
"with": "src/environments/environment.prod.ts"
}
],
// ...
},
"production-client-a": {
"fileReplacements": [
{
"replace": "src/environments/environment.client-a.prod.ts",
"with": "src/environments/environment.prod.ts"
}
],
// ...
},
"staging-client-b": {
"fileReplacements": [
{
"replace": "src/environments/environment.client-b.staging.ts",
"with": "src/environments/environment.prod.ts"
}
],
// ...
},
"production-client-b": {
"fileReplacements": [
{
"replace": "src/environments/environment.client-b.prod.ts",
"with": "src/environments/environment.prod.ts"
}
],
// ...
},
}
}
}
}
}
}
but this could quickly grow out of hand if the number of clients and environments increases.

Suppose that your application is deployed using 20 different configurations, each for a different client. If the configuration changes for a client, a single rebuild is required. However, if the application code changes, 20 rebuilds are required.

As the number of deployments grows, the number of rebuilds grows accordingly.

#### Limitation 2: The application config is part of the application code

An application's config is considered everything that is likely to vary between different deploys (staging, production, client A, client B, etc).

Storing the application config part in your application code repository can introduce security risks. Imagine that you hire an external consultant to work on your private application code. The consultant now has access to all private configuration data that is stored in your config, because your environments are stored in your code repository.

#### Limitation 3: Not flexible enough for dynamic cloud solutions

Modern cloud-based hosting infrastructure can scale dynamically. A fixed config prevents deployments tools from dynamically scaling and configuring your application as needed.

These limitations are described in more detail in [The Twelve-Factor App config rule](http://12factor.net/config) that states that there should always be a **strict separation of config from code**.

If your application is not affected by these limitations, the built-in Angular CLI [application environments](https://github.com/angular/angular-cli/wiki/stories-application-environments) are perfect for storing configuration details.

However, if your application needs to overcome one of these limitations, you need a different mechanism.

## How back-end engineers solve this

Back-end engineers have been facing the same problem for years.

They typically solve it by storing configuration details in environment variables. Then they read the values of the environment variables in their back-end applications. Problem solved!

Unfortunately, front-end applications do not have access to such a back-end environment variable mechanism.

So are we, front-end developers, doomed forever?

Fortunately not!

## The Solution in Angular

Before we have a look at **HOW**, let's define the *WHAT* and *WHY* of our mission, so that we can verify the end result with our goals.

### WHAT do we want to accomplish?

We want to extract all configuration details out of our Angular application.

### WHY do we want to do that?

We want to be able to:

- deploy our Angular application in different environments (staging, production, client A, client B, etc.) with different configurations **without rebuilding the Angular application**.
- share our Angular application code with external parties at any given moment **without leaking any confidential configuration details**.

The only remaining question is **HOW** do we do that?

Time for code!

## STEP 1: Simulating an environment

We already learned that back-end engineers use environment variables, so let's learn from their prior art and tackle the problem in a similar way.

For the sake of demonstration, let's assume that we need to store 2 environment variables:

- `apiUrl`: the URL of our API
- `enableDebug`: whether or not we wish to enable debug mode

First, let's create a new file `env.js` in the same directory of our application's `index.html` file with the following contents:

```javascript
(function (window) {
  window.__env = window.__env || {};

  // API url
  window.__env.apiUrl = 'http://dev.your-api.com';

  // Whether or not to enable debug mode
  // Setting this to false will disable console output
  window.__env.enableDebug = true;
}(this));
This will make a special (global) variable __env available in our browser window containing the environment variables for our application.
Next, we add a <script> element to the <head> section in our index.html to load env.js before Angular is loaded:
<html ng-app="app">

  <head>
    <!-- Load environment variables -->
    <script src="env.js"></script>
  </head>

  <body>
    ...
    <!-- Angular code is loaded here -->
  </body>

</html>
By default, JavaScript files such as env.js are not copied to the output directory when we build our application.
To make sure that the file is copied to the output directory when we run ng build or ng serve, we must add it to the assets section of our application's build configuration in angular.json:
{
  "projects": {
    "app-name": {
      "architect": {
        "build": {
          "options": {
            "assets": [
              "src/favicon.ico",
              "src/assets",
              "src/env.js" // <= Add env.js here
            ]
          }
          "configurations": {
            "production": {
              "fileReplacements": [
                {
                  "replace": "src/environments/environment.ts",
                  "with": "src/environments/environment.prod.ts"
                }
              ],
              // ...
            }
          }
        }
      }
    }
  }
}
Notice how src/env.js is added to the assets property, next to src/favicon.ico and the src/assets directory.
When we now run ng build or ng serve, the env.js will be available.
When runningng build, you can verify whether theenv.jsfile is available in the output directory. When runningng serve, you can navigate your browser tohttp://localhost:4200/env.js. When navigating your browser to your application, you can open the console in your browser and typewindow.__envto verify whether the environment variables are loaded correctly in the globalwindowobject.
STEP 2: Loading the environment in Angular
Now that we have our environment variables available as a special __env property on the global window object, we can provide Angular with a recipe to create a service that has access to our environment variables, so that we can read the environment variables anywhere in our application using Angular dependency injection.
To accomplish that, we will set up the following parts:
EnvService: a plain TypeScript class to represent theEnvServicethat can be injected anywhere in our application using Angular dependency injectionEnvServiceFactory: a factory that reads environment values fromwindow.__envand instantiates an instance of theEnvServiceclassEnvServiceProvider: an Angular provider recipe to registerEnvServiceFactorywith Angular dependency injection as the factory for instantiatingEnvService
By using a TypeScript class for EnvService, we can rely on typing (and typeahead support) when working with environment values in our favorite IDE.
How sweet is that!
Let's use Angular CLI to create an env.service.ts file for our EnvService class:
$ ng generate service env
and replace its contents with:
export class EnvService {

  // The values that are defined here are the default values that can
  // be overridden by env.js

  // API url
  public apiUrl = '';

  // Whether or not to enable debug mode
  public enableDebug = true;

  constructor() {
  }

}
There is nothing Angular-specific about the EnvService class. It is a plain TypeScript class that contains typed properties for all the variables we wish to store in our environment. The class will be used by our EnvServiceFactory to create an instance of EnvService and the type information helps the TypeScript compiler provide us with type support during development.
The values assigned to the variables in the EnvService class definition are the default values that will be overwritten by the custom values from env.js, assuming there is an env.js and that it can be loaded successfully.
If env.js cannot be loaded, the application will fall back to the default values defined in the EnvService class.
TIP: If your application is unable to run in production with the default values, you can add a special property e.g.public envFileLoaded = falsethat is overwritten and set totruebyenv.js. Then, if the property isfalsewhen your Angular application is loaded, you can present the user with a friendly message thatenv.jscould not be loaded, instead of falling back to the default values.
To provide the Angular dependency injector with a recipe to create an instance of the EnvService class, we create an EnvServiceProvider.
Angular CLI does not come with a recipe to create a provider, so let's create the env.service.provider.ts file manually in the same directory and add the following contents:
import { EnvService } from './env.service';

export const EnvServiceFactory = () => {
  // Create env
  const env = new EnvService();

  // Read environment variables from browser window
  const browserWindow = window || {};
  const browserWindowEnv = browserWindow['__env'] || {};

  // Assign environment variables from browser window to env
  // In the current implementation, properties from env.js overwrite defaults from the EnvService.
  // If needed, a deep merge can be performed here to merge properties instead of overwriting them.
  for (const key in browserWindowEnv) {
    if (browserWindowEnv.hasOwnProperty(key)) {
      env[key] = window['__env'][key];
    }
  }

  return env;
};

export const EnvServiceProvider = {
  provide: EnvService,
  useFactory: EnvServiceFactory,
  deps: [],
};
First, we import the EnvService class we defined earlier.
Next, we export an EnvServiceFactory function that creates an instance of the EnvService class and copies all values from the window.__env object into the EnvService instance.
TIP: If your application has a complex configuration with nested properties, you can perform a deep merge instead of simply copying the properties.
Finally, we export EnvServiceProvider that can be used by Angular as a provider recipe for the EnvService token.
To register EnvServiceProvider as a recipe with Angular's dependency injection system, we must list it as a provider in our application's providers array:
// ...
import { NgModule } from '@angular/core';
import { EnvServiceProvider } from './env.service.provider';

@NgModule({
  imports: [ // ... ],
  providers: [EnvServiceProvider],
})
export class AppModule {}
That's it!
We can now access our environment variables from anywhere in our application by injecting the EnvService:
import { Component } from '@angular/core';
import { EnvService } from '../env.service';

@Component({
  selector: 'app-home',
  templateUrl: './home.component.html',
  styleUrls: ['./home.component.scss'],
})
export class HomeComponent {
  constructor(
    private env: EnvService
  ) {
    if(env.enableDebug) {
      console.log('Debug mode enabled!');
    }
  }
}
TIP: If you were runningng servewhen you updatedangular.json, you will have to restartng servefor the development server to pick up the new configuration.
But wait, doesn't this just shift the problem to env.js?
No, in contrast with Angular CLI application environments, you no longer have to rebuild your application to update its configuration.
When you build your application using ng build --prod, env.js will appear in your dist directory:
-rw-r--r--   1 jvandemo  staff    2179 Aug 14 09:36 3rdpartylicenses.txt
-rw-r--r--   1 jvandemo  staff     265 Aug 14 09:36 env.js
-rw-r--r--   1 jvandemo  staff    5430 Aug 14 09:36 favicon.ico
-rw-r--r--   1 jvandemo  staff     646 Aug 14 09:36 index.html
-rw-r--r--   1 jvandemo  staff  171249 Aug 14 09:36 main.xxx.js
-rw-r--r--   1 jvandemo  staff   59561 Aug 14 09:36 polyfills.xxx.js
-rw-r--r--   1 jvandemo  staff    1053 Aug 14 09:36 runtime.xxx.js
-rw-r--r--   1 jvandemo  staff       0 Aug 14 09:36 styles.xxx.css
If you serve the contents of the dist directory using a static web server like serve, you will notice that you can now edit env.js in your dist directory to control the environment variables within your Angular application without the need for a rebuild. As soon as you refresh your browser, the new environment variables are picked up:
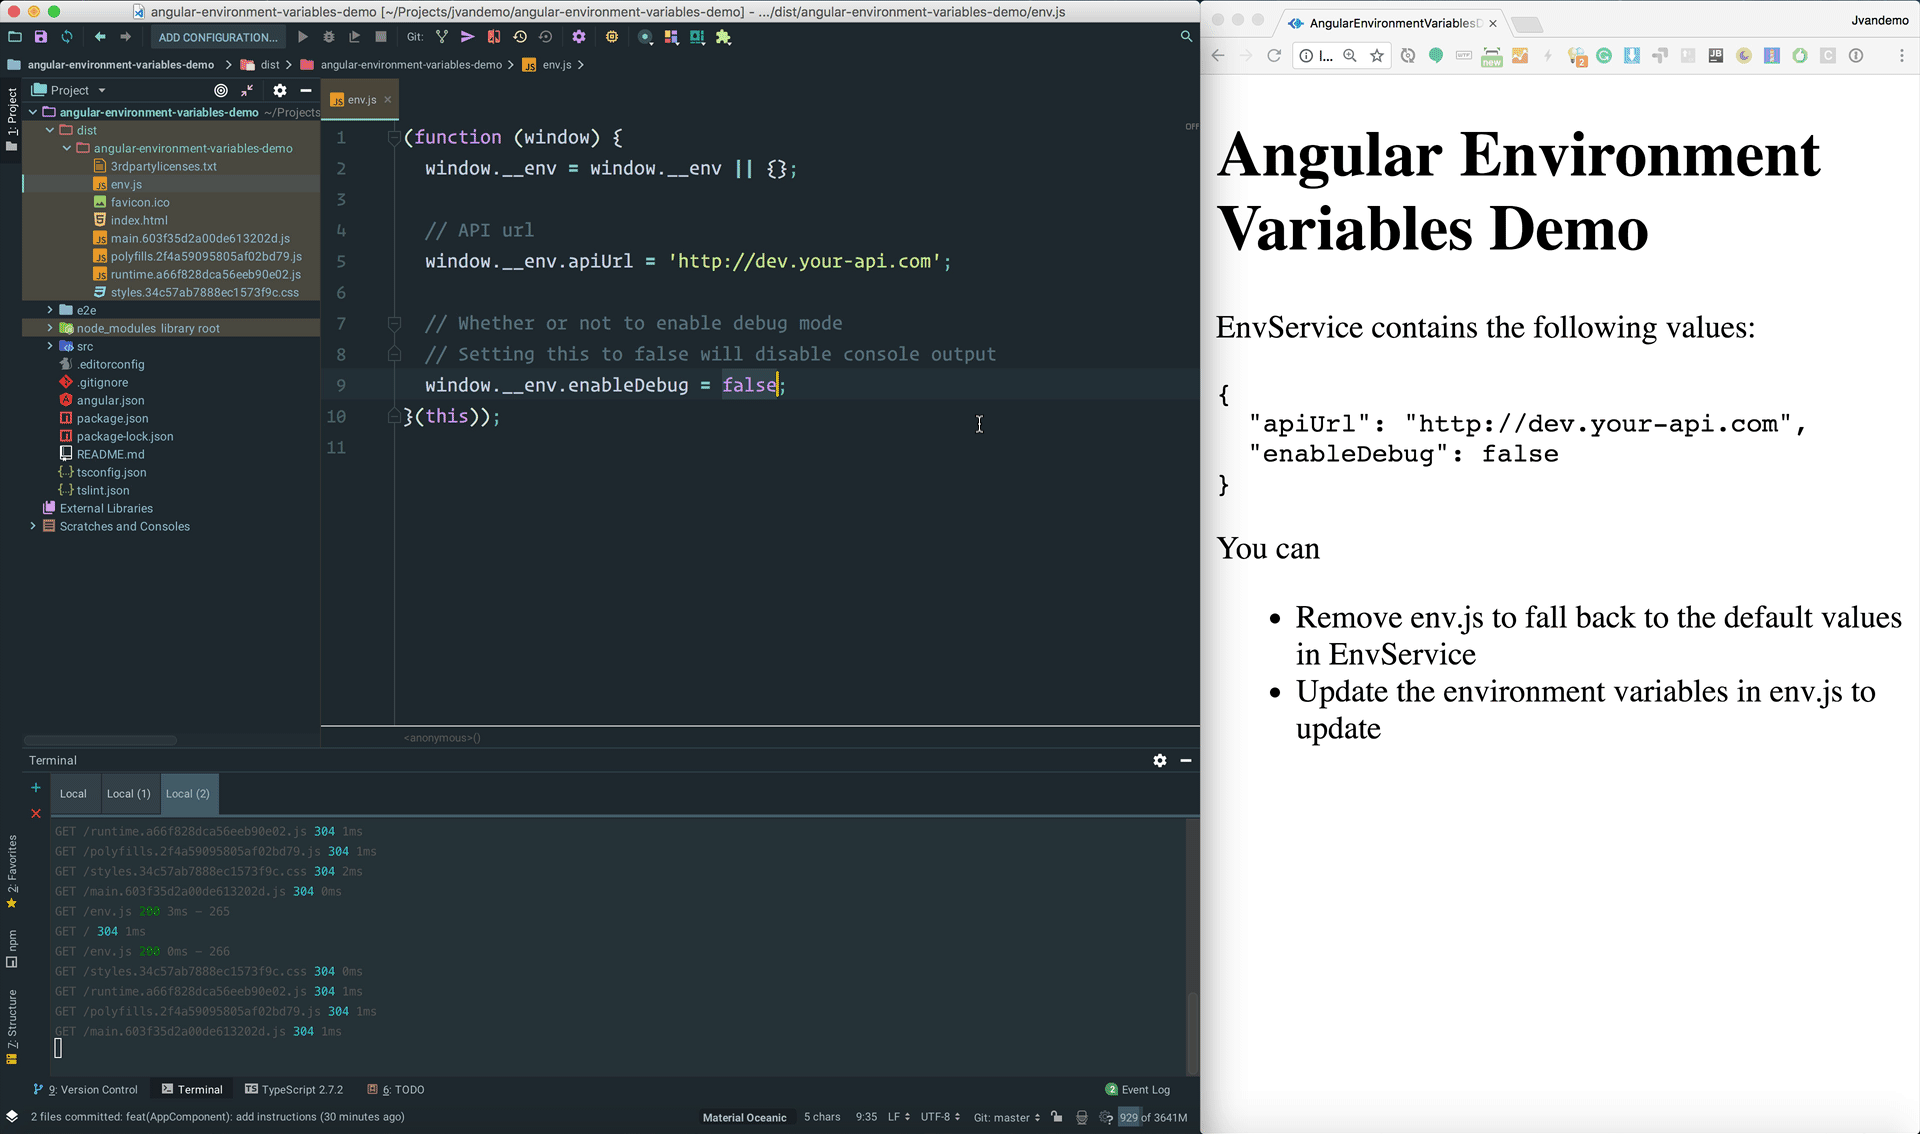
You can commit a default env.js in your code repository with values that are needed for local development and can safely be shared with external developers:
(function (window) {
  window.__env = window.__env || {};
  window.__env.apiUrl = 'http://localhost:8080';
  window.__env.enableDebug = true;
}(this));
Your deployment team can then open env.js to see which environment variables are available in your application and update their values accordingly for a specific deployment such as staging, production, client A or client B:
(function (window) {
  window.__env = window.__env || {};
  window.__env.apiUrl = 'http://production.your-api.com';
  window.__env.enableDebug = false;
}(this));
Reconfiguring the application using env.js can now be done by the deployment team and does not require a rebuild of the Angular application.
If you feel adventurous, you can even load env.js from an external URL that returns a different configuration depending on who makes the request (e.g. use the client's IP address to return a different configuration).
This powerful mechanism allows for flexible deployments where the same application needs to be configured differently in different environments, without having the opportunity to build different versions.
Summary
If we have the ability to rebuild our application for use in different environments, the built-in Angular CLI application environments are perfect for storing configuration details.
However, if our application needs to be deployed with a different configuration in different environments without having the ability to rebuild it, we need a different mechanism.
By strictly separating all configuration details in env.js, our application can now be:
- deployed to different environments (staging, production, client A, client B, etc.) with different configurations without rebuilding the Angular application
- shared with external parties at any given moment without leaking any confidential configuration details
Which is exactly what we needed to accomplish.
You can find a working example right here.
Have a great one!